
The Cape Wind project has been approved by the federal government after an extended battle over the issue. For me, this is one of the most interesting not in my back yard battles I've seen in recent years. It certainly amazes me that the party that wants to drill in the Alaska National Wildlife Refuge is opposed to Cape Wind. A case of out of sight out of mind? I know I cannot support canceling this project when the main opposition arguments are that it will be ugly and make fishing harder.
I completely agree with those that say the view of the sound would never be the same. Though I feel it will become a national wonder like the Hoover dam. At my dad's cabin on Lake Huron we can see giant wind turbines on the horizon and they are fascinating. We take turns looking through binoculars at them, and I have never once thought that they ruined the skyline. There is a majesty in the sight of wind turbine's cranking away on the horizon that I find tranquil and calming.
On the fishing front, my main issue with the current plan is that it is too accommodating to fishermen. I would love it if the proposed area would be off limits to all industrial fishing operations and become a marine preserve. As much as fishermen might complain I believe the long term benefits to marine and the fisheries off the Cape would far outweigh the short term hardships. Though I know that long term benefits would do nothing to assuage a fisherman that lost his livelihood in the short term.
To be fair, I'm not one of the property owners or fisherman that will be effected by the project. Though if it knocked property values down to a range where I could afford to own a vacation home on the Cape I wouldn't complain about the view. I can understand their concerns, but when I weigh a future where the Cape is under water from global warming or the Cape has a view of wind turbines in the Sound I'll take the wind turbines. I am not so naive to think this project alone would make a difference, but I think it is a stepping stone to a solution.
I'm sure there will be plenty of legal challenges to it, but with everything I know about I really hope I'm around to see this project rise above the waves. If it's opponents do manage to kill this project than I know I will lose even more of my hope for the future of our planet.
Thursday, April 29, 2010
Wednesday, April 28, 2010
Franklin Selling Rain Barrels
The town of Franklin Department of Public Works is selling rain barrels and compost bins. I am tempted to pick up a second rain barrel for our house.
However, those compost balls they are selling are junk. We own one. They are too flimsy for the amount of material they can hold, causing the sphere to deform and the lid to pop off when rolled. I suppose you could stick to composting just a few pounds of wastes at a time, but then for the months that they spend composting, you have to do something else with all the compostables coming out of your kitchen. That means either a second (and possibly a third, fourth, and fifth) compost ball, or landfill (which defeats the purpose).
For serious composting, a plain wood box works better. Or, heck, the cheapest (if ugliest) route is just to make a pile on the ground.
Thanks to Franklin Matters for the heads-up.
Tuesday, April 27, 2010
Alfalfa Goes to Court
Roundup Ready Alfalfa goes before the Supreme Court today.
Monsanto's take on this.
A New Your Times article on the subject.
Monsanto's take on this.
A New Your Times article on the subject.
Monday, April 26, 2010
Critters in the Yard
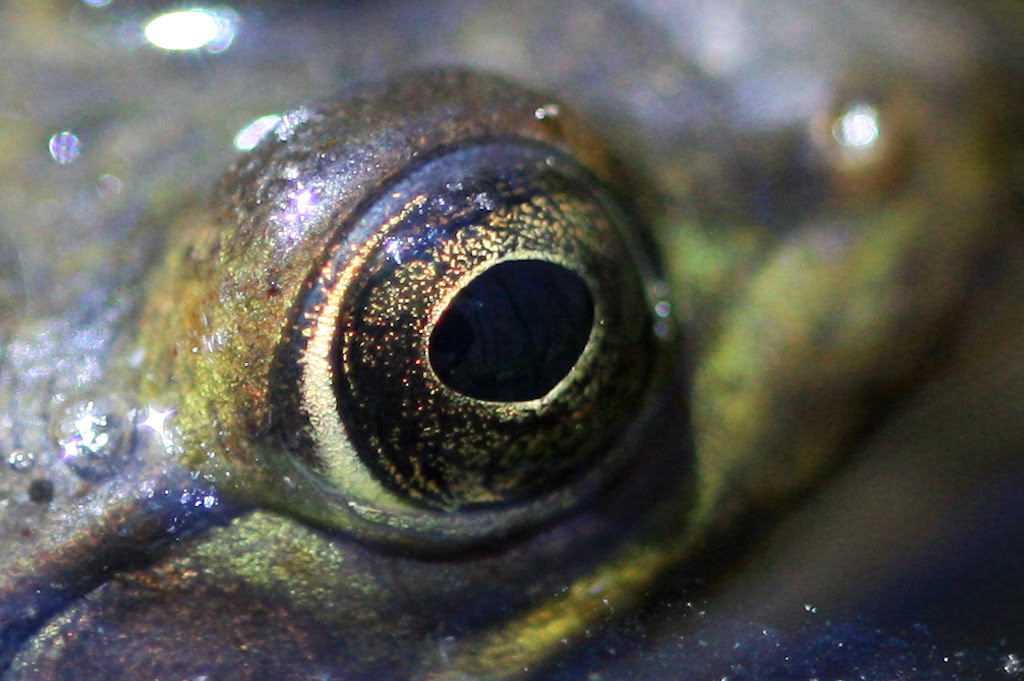 The frogs have returned to our little pool of standing water. I love the location since it has a rock large enough for me to lay down on right at its edge. This lets me take up residence and wait for the frogs to surface after they jump in when I get into place. This frog eye photo is of a frog about the size of my thumb from about five inches away. I love frog eyeballs and their little flecks of gold.
 Here's the same frog from the photo above from further away as I was slowly creeping the camera closer. Sorry buddy, but that leaf isn't hiding you.
 This is a different frog that didn't stay still long enough for me to get extra close. I think he felt particularly exposed and decided to head for deeper water. I love how the bubbles cling to them.
 I found a garter snake near the house and Michelle captured it for re-location to the asparagus patch. The asparagus patch is chock full of slugs which loved eating the asparagus under its layer of leaf mulch. Mental note for next year, pull back the leaf mulch in the spring. Now that we've pushed the mulch away from the asparagus it isn't being attacked by the slugs, and hopefully this little guy chowed down on a couple too.
 We have a lot of snakes in our yard, though more often than not I hear them rather than see them. We have lots of snake habitat that Michelle has created, and being good snake habitat they can retreat into it and go unseen. You can still hear them slide away as you approach though. Now if only they would eat more slugs!
Sunday, April 25, 2010
Charles River Watershed Cleanup
Yesterday was the yearly Charles River Watershed Cleanup Day. After meeting at the local Whole Foods, we went out to our designated location: a dirt road leading out to a dammed bit of the Charles.

You can see my friend Walt out there, just between the trees. He donned waders and bravely slogged out into the wetland to extract trash. Among the stuff he hauled out were a broken baseball batting practice device, part of a table, an entire sealed bag of garbage that someone else had dumped, and the ingredients of beer pong: beer bottles and ping-pong balls.

He also brought a turtle back to shore for Gabe to examine. A snapping turtle perhaps? Judging by the damage to its shell, the poor critter had led a rough life.

Kelly, Gabe and myself stuck to the shore. Of the three of us, Kelly did the most work. I bagged a measly half-bag in between keeping Gabe out of the poison ivy and ineffectively keeping the gnats from biting his neck. Gabe contributed a few sticks and leaves.

Walt and Gabe.

Here is Gabe scaling sand bags left over from the recent flooding. . .

. . .and playing with sticks.

And this is what we were cleaning up. Beautiful, isn't it?

You can see my friend Walt out there, just between the trees. He donned waders and bravely slogged out into the wetland to extract trash. Among the stuff he hauled out were a broken baseball batting practice device, part of a table, an entire sealed bag of garbage that someone else had dumped, and the ingredients of beer pong: beer bottles and ping-pong balls.
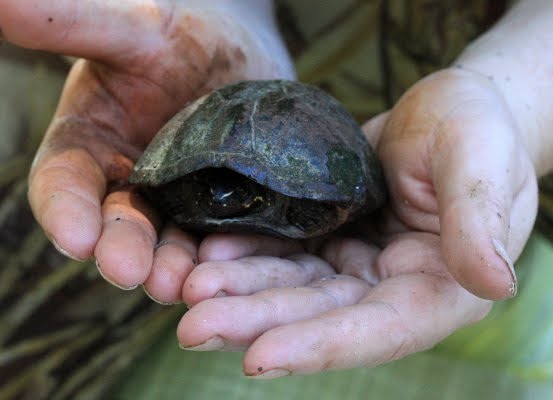
He also brought a turtle back to shore for Gabe to examine. A snapping turtle perhaps? Judging by the damage to its shell, the poor critter had led a rough life.

Kelly, Gabe and myself stuck to the shore. Of the three of us, Kelly did the most work. I bagged a measly half-bag in between keeping Gabe out of the poison ivy and ineffectively keeping the gnats from biting his neck. Gabe contributed a few sticks and leaves.

Walt and Gabe.

Here is Gabe scaling sand bags left over from the recent flooding. . .

. . .and playing with sticks.

And this is what we were cleaning up. Beautiful, isn't it?
Thursday, April 22, 2010

Wednesday, April 21, 2010
Raptor in the yard!
"Squawk."
"Squawk."
There are a lot of squawks in our yard, but this one caught my attention with its brevity. I chased the sound to the top of our oak tree just in time to see a heavy, long-tailed bird flap off. I thought it might be a grouse. Later, I heard the call again, and saw a pair of the birds swoop around the house. Not grouse, for sure. Birds of prey.
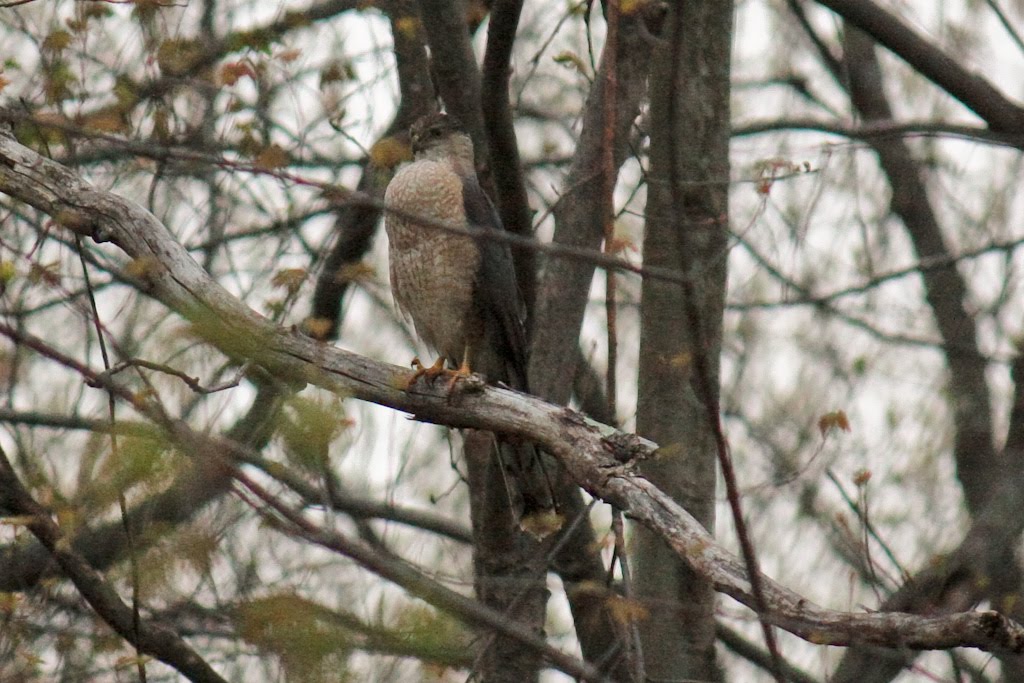
That was over the weekend. Today the squawking bird greeted us as we got home from work. Not only did he sit on a snag long enough for Chris to find the telephoto lens, he didn't seem put off by my son, who was busy dumping handfuls of dirt into his toy wheelbarrow. Perhaps the bird was eying Gabe as a potential meal.


I'm no birder. Is this a Cooper's hawk, perhaps? It's about the size of a crow. The pitch of its size matches the calls that can be heard here at the Cornell Lab of Ornithology, and the individual "squawks" match the description of the "kik" call that the male makes to tell the female where he is.
But then again, it could be a sharp-shinned hawk:
"Separating Sharp-shinned Hawks from Cooper's Hawks is one of the classic birding challenges. The birds look very similar and can be similarly sized. Cooper's Hawks have a larger head that juts farther out ahead of the wings compared with Sharp-shinned's pinhead. Cooper's have "hackles" that are sometimes raised, giving them a fierce look versus Sharp-shinned's more timid, round head. Adults have a pale nape, making them look like they're wearing a dark cap. Juvenile Cooper's Hawks are more finely streaked below than Sharp-shinned. When perched, look for Cooper's Hawk's thicker legs and big feet."
For some reason I thought identifying large predatory birds would be easier than identifying obscure plants. Sheesh.
"Squawk."
There are a lot of squawks in our yard, but this one caught my attention with its brevity. I chased the sound to the top of our oak tree just in time to see a heavy, long-tailed bird flap off. I thought it might be a grouse. Later, I heard the call again, and saw a pair of the birds swoop around the house. Not grouse, for sure. Birds of prey.
That was over the weekend. Today the squawking bird greeted us as we got home from work. Not only did he sit on a snag long enough for Chris to find the telephoto lens, he didn't seem put off by my son, who was busy dumping handfuls of dirt into his toy wheelbarrow. Perhaps the bird was eying Gabe as a potential meal.


I'm no birder. Is this a Cooper's hawk, perhaps? It's about the size of a crow. The pitch of its size matches the calls that can be heard here at the Cornell Lab of Ornithology, and the individual "squawks" match the description of the "kik" call that the male makes to tell the female where he is.
But then again, it could be a sharp-shinned hawk:
"Separating Sharp-shinned Hawks from Cooper's Hawks is one of the classic birding challenges. The birds look very similar and can be similarly sized. Cooper's Hawks have a larger head that juts farther out ahead of the wings compared with Sharp-shinned's pinhead. Cooper's have "hackles" that are sometimes raised, giving them a fierce look versus Sharp-shinned's more timid, round head. Adults have a pale nape, making them look like they're wearing a dark cap. Juvenile Cooper's Hawks are more finely streaked below than Sharp-shinned. When perched, look for Cooper's Hawk's thicker legs and big feet."
For some reason I thought identifying large predatory birds would be easier than identifying obscure plants. Sheesh.
Clean Up the Charles
The annual Charles River Watershed Cleanup is happening this weekend. Information can be found here.
Tuesday, April 20, 2010
ALIENS ATTACK!

Dear god, what is this freakish monster? Look at those TEETH! I see the remnents of its last meal stuck there. Pass the dental floss while I run away, please.

Oh, wait. . . it's just a pretty little violet.

They're native. *phew!*

Monday, April 19, 2010
The Most Beautiful Part of Spring. . .
. . .is not a Bradford pear, or daffodils, or forsythia yellow enough to make your eyes bleed. It's this.

This is the view from our dining room. Some would call it a feted swamp. I call it a symphony of frogs, a vast painting of the one color I longed for through the winter. As I watch the skunk cabbage perform its yearly miracle of unfolding, as I walk along the edge and peer into the landscape of unexpectedly tropical-looking leaves, my breath is stolen by the beauty. As a gardener, I hope that one day I might achieve the perfection that nature has so casually left lying in my backyard.

This is the view from our dining room. Some would call it a feted swamp. I call it a symphony of frogs, a vast painting of the one color I longed for through the winter. As I watch the skunk cabbage perform its yearly miracle of unfolding, as I walk along the edge and peer into the landscape of unexpectedly tropical-looking leaves, my breath is stolen by the beauty. As a gardener, I hope that one day I might achieve the perfection that nature has so casually left lying in my backyard.
So Much Gardening!
We spent a downright decadent amount of time gardening today. I moved some dirt into the veggie garden for Chris (though by far he did the bulk of the work), I moved the compost explosion into the shiny new compost bin, and I gave the front shrubs a much-overdue haircut. (With old-fashioned clippers, I must add. Finally, my spring exercise regime is here!)

One year ago, a friend sent me home with half a dozen branches from one of her shrubs, which she had been forced to hastily chop to accommodate construction workers. She said "shove them in the ground and they'll grow!" I did, and one of them took. You can see it in this picture there on the left. Now if only I could remember what it is.
I had noticed that wherever the silky dogwood is crushed to the ground by fallen branches, it roots and grows new shoots, so it occurred to me that I could root some native plants by the shove-in-the-ground method. So in this otherwise useless muddy patch, I have made rows of silky dogwood, witch hazel, crab apple, spice bush, and honey locust. Perhaps in a year's time I'll have some little trees to share.

While collecting cuttings from our crab apple, which is inconveniently behind the shed, I tripped over this: a yew shrub which had been dumped to die, but which was still clinging to life. The trunk is gnarly and it has a root that looks like the leg of a dragon, so I figured why not stick it in a pot, and call it an ugly bonsai? I want to improve at container gardening, so this seems like a suitable subject. Poor shrub!

Gabe helped me revamp the birdbath area. He helped me load many buckets of rocks for this. Chris snapped the photo before I put plants in the pots, but they need some time to fill in anyway. Gabe made his first solo exploration of the swamp path while I dug violets, and the other pots now contain wild strawberry and bee balm.
I was going to remove the eyesore basketball backboard today, but somehow, I never got around to it.
Marathon Gardening on Patriot's Day
 Thanks to the Boston Marathon and Patriot's Day we were able to spend the whole Monday out in the yard. Gabe loves being outside as there are so many thing for him to explore. We always try to keep one of us within snatch and grab distance, but there was no need today: he was very well behaved. Garden terminology is already creeping into his vocabulary, with "compost" being a favorite, and I can't wait to further corrupt him! ;)
 Speaking of compost, Gabe was so helpful that he got in on the action as I cleared out some of last year's dried up basil. He really enjoyed running them over to the compost bin. He also helped Michelle carry rocks for her various projects. I heard him say 'heavy rock' several times as he tried to find one he could lift.
 The bulk of today's effort was dedicated to moving tons of dirt and compost. When I say we moved tons of dirt, I literally mean we moved tons of dirt. We hauled about 4 cubic yards of sodden loam and about 3 cubic yards of equally sodden compost. That's 189 cubic feet of dirt. To put that into perspective, your typical compost or topsoil bag at the store contains 2 cubic feet. Imagine moving 94 of those bags over the course of an afternoon.
My muscles already hate me, I'm sure they'll extract their full revenge over the next couple days. A cubic yard of dirt weighs between 1 and 2 tons depending on how wet it is, and from the ache in my bones I believe ours weighed at least 5 tons a yard.
 All of that loam and compost is moving into the garden to fill in the old walkways between the raised beds. Additional compost is being spread out over the old raised beds as well. Some remains to be done, but by around 4pm I was worn out, so I moved my attention to getting the peas into the ground.
I planted two hundred peas, mostly beneath the solar cones. As a control I also planted peas out in the open. They're living under supports made of leftover rolls of fencing, visible there on the left. As bush peas they technically could go without support, but those should help them stay upright if it gets windy.
It seems silly to be getting rid of the raised beds after just one year, but the solar pods just didn't fit with the dimensions of the raised beds. But on the plus side, this should give me extra growing space. I'm going to use the boards left over from the bed edges for walkways in the garden to help spread out my weight as I work, and I'm planning on putting the rest to good use as some drop frames, and perhaps some small raised beds outside of the main garden.
 The seedlings spent the day outside living under the solar pod greenhouse. At the end of the day the ambient air temp was 59 degrees and it was 72 degrees inside the greenhouse. It would have been higher, but, by tilting the structure with a brick, I vented it during the afternoon to keep the temperature from going above 85. The seedlings were looking very happy when I took them indoors for the night.
 The thermometer spent the day inside the pod, propped against the plywood to keep it out of the sun, and there it will spend the night as well. This thermometer records a min/max over a period of 24 hours, which is perfect for collecting gardening data. I'll be curious to see how low the temperature dips tonight.
Sunday, April 18, 2010
Compost Bin
 I took advantage of the rainy weather today to build Michelle a compost bin. A project that is long over due. My compost ball from last year has indeed made some nice compost, but is nowhere near as handy as I would have hoped. The construction simply doesn't hold up to the weight of compost. There are plenty of similar "COMPOST NOW NOW NOW!" products out there, but of all the instant things in the world I don't need instant compost. I'm more than happy to wait.
MATERIALS USED
- 8 - 5/4 inch x 6 inch x 8 foot boards
- 1 Sharpie
- 1 Jigsaw w/ Wood Cutting Blade
- 1 Drill w/ 3/8ths inch wood drill bit
- 1 Tape Measure
 To create the template board and cut out all the others I started by drilling holes in the corner of the cut out. Then I used a jigsaw to cut out the pieces. The wood blade I was using was just the right size to fit into a 3/8ths inch drill hole. Once they were all cut out they fit together just like good old Lincoln Logs. I had made a couple of the first pieces with cuts that were 1 1/2 inches deep which lead to there being no gaps for air, which is why I moved to the 1 inch cuts for the rest.
No fasteners to rust, and though it isn't perfect it is easy to pull boards off to get access to the pile and easy to re-assemble after. After the solar pod work this was a nice easy project that didn't require a lot of precision. I did finish the solar pod on Saturday, but that's a much longer post. The short version is I'm very happy to be done, even with all the mistakes I made along the way.

Thursday, April 15, 2010
An Unexpected Bloom
We were soaking up the morning sun when an unexpected flower caught my eye.

These little trees were mere rooted sticks a year ago. I had assumed that, like most fruit-bearing trees, that it would be several years before we saw flowers or fruit. But I was forgetting that these saplings are actually cuttings from a mature plant, so even though they are yet small, they are eager to reproduce.
See it? There towards the middle?

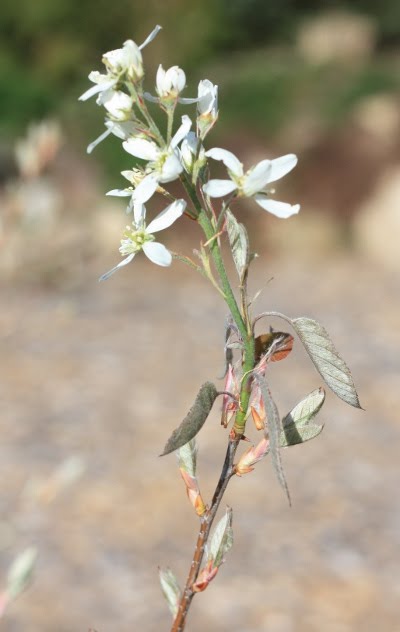
Of the ten trees, this one is the largest. It's as big around as my thumb now. And it has flowers!
This is the first time I have ever seen a serviceberry blooming. Right now there are quite a few white-flowered trees blooming at the wood-edges along the highway, too, so I suspect those are also serviceberry.
Serviceberry, Amelanchier canadensis, also known as Juneberry, Canadian serviceberry, or shadblow serviceberry, is an East-coast native understory tree that should really be used more by the horticulturial industry. In addition to the lovely white flowers and silvery foliage, it bears edible berries. I have read that the berries are like blueberries, but sweeter. The only reason that nobody eats them is that the birds strip the trees bare too quickly to make cultivation worthwhile.

I notice how much the blossoms look like apple blossoms, and also like strawberry blossoms, and old-fashioned roses. But this is no surprise, because all of these plants are in the rose family.

This little loop of saplings is going to be my son's play-fort in a few years, and maybe a nice shady place to read a book after he has outgrown it. Here he is with his father, testing it out.

These little trees were mere rooted sticks a year ago. I had assumed that, like most fruit-bearing trees, that it would be several years before we saw flowers or fruit. But I was forgetting that these saplings are actually cuttings from a mature plant, so even though they are yet small, they are eager to reproduce.
See it? There towards the middle?
Of the ten trees, this one is the largest. It's as big around as my thumb now. And it has flowers!
This is the first time I have ever seen a serviceberry blooming. Right now there are quite a few white-flowered trees blooming at the wood-edges along the highway, too, so I suspect those are also serviceberry.
Serviceberry, Amelanchier canadensis, also known as Juneberry, Canadian serviceberry, or shadblow serviceberry, is an East-coast native understory tree that should really be used more by the horticulturial industry. In addition to the lovely white flowers and silvery foliage, it bears edible berries. I have read that the berries are like blueberries, but sweeter. The only reason that nobody eats them is that the birds strip the trees bare too quickly to make cultivation worthwhile.

I notice how much the blossoms look like apple blossoms, and also like strawberry blossoms, and old-fashioned roses. But this is no surprise, because all of these plants are in the rose family.

This little loop of saplings is going to be my son's play-fort in a few years, and maybe a nice shady place to read a book after he has outgrown it. Here he is with his father, testing it out.
Tuesday, April 13, 2010
Recycled Greenhouse
Chris found this amusing link: plans for building a greenhouse out of recycled soda bottles.
To my amazement, it doesn't look like the shabby recycled mess that I assumed it would. It's rather pretty, in fact. But I do wonder how long it will be before it starts looking shabby.
To my amazement, it doesn't look like the shabby recycled mess that I assumed it would. It's rather pretty, in fact. But I do wonder how long it will be before it starts looking shabby.
Happy Dirt Day
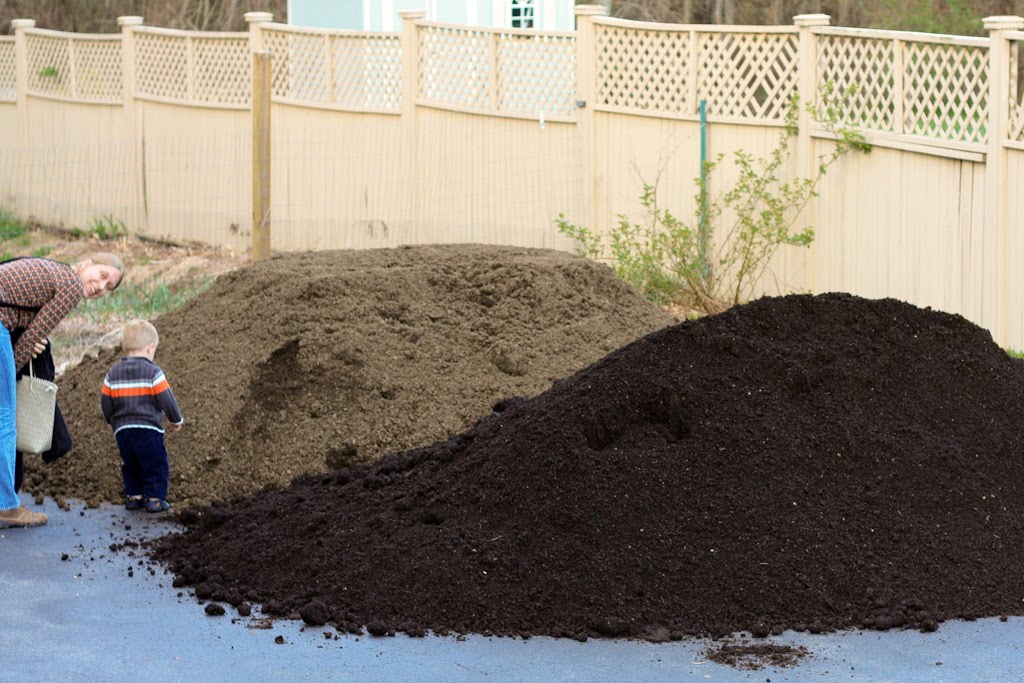 Yesterday was Michelle's birthday, and for her birthday two big piles arrived. The lighter brown pile is 8 yards of loam and the darker pile is six yards of organic compost. Happy Dirt Day Michelle I love you my gardener in crime.
The loam is from K&K Mulch and Loam in Franlin MA
The compost is from Groundscapes Express in Wrentham MA
We've ordered loam and mulch from K&K before and have always been happy with their service and product. I found Groundscapes Express on the NOFA website on their approved organic listing.
It actually took a couple of hours of searching online to find a local source of bulk organic compost and I usually find what I'm looking for online very quickly. The compost is beautiful and I'm looking forward to arranging a trip to visit their facility. When I called and talked with John, their composting operation guy, I knew I had found someone who was really into his job. They have a detailed analysis of their compost online too. I can't wait to start growing in it!
Sunday, April 11, 2010
Constructing a Solar Pod
The Solar Pod has already proven to be far more complicated than the Solar Cones were. Last weekend my friend Steve came down to help me start assembling the pod, and we had the basic structure complete by the end of the day. I use the term "complete" loosely as we were far from perfect in our construction of the end plates, which really are the most difficult part of the assembly. Curves are hard.
 The template in the book provides only the most basic of information. We had to do a lot of our own measuring and marking on the template to figure out the actual distances along the curve, and we made multiple mistakes along the way. It took us a long time to get to the point where we could cut out the first end plate.
 In this shot you can clearly see the tangle of measurement lines. We luckily Steve knew which one to follow.
 Once both end plates were cut out we went on to sanding them down to match our measurements. After this we stacked both end plates on top of each other and clamped them down tight. This let us sand them down to the point where they roughly matched each other, to allow the fiberglass sheet to rest smoothly across the length of the Solar Pod.
 Now when I say we made the curve smooth, I mean we made the curve sort of smooth in a wavy sort of way. The end plates pictured above have the spacer attached and you can clearly see the curve is imperfect on the inside part of the arc. Luckily the imperfections haven't been insurmountable.
 Gabe was really interested in what we were doing and pitched in to help whenever he could. He really loved the right angle ruler.
 Here Gabe tied to pick up the ruler while standing on it. This did not work.

Despite all of the setbacks we still managed to assemble the basic structure by the end of the day. Once we deemed the end plates "good enough for government work" assembling the rest was rather simple by comparison. The plans recommend cutting the 2x4x8s down a couple inches, but since the fiberglass panes were larger than spec we didn't and it made no difference later on.
 With some help from Michelle placing the glazing down onto the silicone caulk, the process of drilling and screwing the inner glazing down was really straight forward. I cut it to 96" long instead of the 94 1/2 the directions recommended, and I had to trim an inch off the width due to our imperfect curve. Still, once it was cut to size it attached seamlessly despite the wavy curve.
 You can see in this shot that the Solar Pod is not particularly tall. I'm already certain that I'm going to have to build at least one of the drop bases for it, if not one of the permanent insulated bases, in order to give the plants under it enough space to grow up.
 If I had thought about it I would have stained the wood long before we started assembling it, and certainly before the inner glazing was on, but I was so unsure as to whether I'd get this far that it just seemed overly optimistic to do so. Even with the glazing on, however, it was pretty easy to stain the wood. Any I got on the glazing wiped away clean.
The pink insulation was easy to cut with a high tooth count jigsaw blade. We had used the wood endplate pieces to draw out the shape before we assembled them and it meant the insulation fit like a glove. Yay for small successes.
The conduit piping is what ended the day for me. The instructions call for 3/4" conduit piping for the middle, to provide support to the glazing under a heavy blanket of snow - and that's what I bought. However, 3/4" conduit piping means a 3/4 diameter hole inside of the pipe, but the plans only make sense for piping that is actually 3/4" diameter. The diagram also fails to specify what length of piping to use.
Overall, the instructions for the Solar Pod are clear. The end plates were the biggest problem for us, and if you have a better method for drawing the proper arch shape onto the wood then you would probably find the whole project much easier than I did.
If all goes well I hope to complete the pod next weekend.
 The template in the book provides only the most basic of information. We had to do a lot of our own measuring and marking on the template to figure out the actual distances along the curve, and we made multiple mistakes along the way. It took us a long time to get to the point where we could cut out the first end plate.
 In this shot you can clearly see the tangle of measurement lines. We luckily Steve knew which one to follow.
 Once both end plates were cut out we went on to sanding them down to match our measurements. After this we stacked both end plates on top of each other and clamped them down tight. This let us sand them down to the point where they roughly matched each other, to allow the fiberglass sheet to rest smoothly across the length of the Solar Pod.
 Now when I say we made the curve smooth, I mean we made the curve sort of smooth in a wavy sort of way. The end plates pictured above have the spacer attached and you can clearly see the curve is imperfect on the inside part of the arc. Luckily the imperfections haven't been insurmountable.
Despite all of the setbacks we still managed to assemble the basic structure by the end of the day. Once we deemed the end plates "good enough for government work" assembling the rest was rather simple by comparison. The plans recommend cutting the 2x4x8s down a couple inches, but since the fiberglass panes were larger than spec we didn't and it made no difference later on.
 With some help from Michelle placing the glazing down onto the silicone caulk, the process of drilling and screwing the inner glazing down was really straight forward. I cut it to 96" long instead of the 94 1/2 the directions recommended, and I had to trim an inch off the width due to our imperfect curve. Still, once it was cut to size it attached seamlessly despite the wavy curve.
 You can see in this shot that the Solar Pod is not particularly tall. I'm already certain that I'm going to have to build at least one of the drop bases for it, if not one of the permanent insulated bases, in order to give the plants under it enough space to grow up.
 If I had thought about it I would have stained the wood long before we started assembling it, and certainly before the inner glazing was on, but I was so unsure as to whether I'd get this far that it just seemed overly optimistic to do so. Even with the glazing on, however, it was pretty easy to stain the wood. Any I got on the glazing wiped away clean.
 The pink insulation was easy to cut with a high tooth count jigsaw blade. We had used the wood endplate pieces to draw out the shape before we assembled them and it meant the insulation fit like a glove. Yay for small successes.
The conduit piping is what ended the day for me. The instructions call for 3/4" conduit piping for the middle, to provide support to the glazing under a heavy blanket of snow - and that's what I bought. However, 3/4" conduit piping means a 3/4 diameter hole inside of the pipe, but the plans only make sense for piping that is actually 3/4" diameter. The diagram also fails to specify what length of piping to use.
Overall, the instructions for the Solar Pod are clear. The end plates were the biggest problem for us, and if you have a better method for drawing the proper arch shape onto the wood then you would probably find the whole project much easier than I did.
If all goes well I hope to complete the pod next weekend.
Solar Cone Plans
 These are the plans from the Solar Gardening book by the Poisson's that I followed. You can find alternative plans for a solar cone here. The link leads to a pdf with a whole bunch of projects in it including the solar cone. The alternate plans waste some of the material so I wouldn't suggest them.
Subscribe to:
Posts (Atom)


